I had my share of problems in trying to get them started. Being the somewhat-obsessive person I am, I read as much as I could find about making sourdough, but only ended up with a lot of conflicting information. The problem is that it's a very delicate process and varies a lot depending on the environment, which causes people to become very adamant that the method that worked for them is the only correct way to do it. It doesn't help that there are few pictures online of the various stages in the process, and that written descriptions of the appearance and smell a good sourdough starter should have tend to be vague and confusing.
I bought organic flours to start them, though I've been feeding them non-organic flours lately. What worked for me was to take one cup each of flour and water and let that sit out in a bowl, lightly covered with a paper towel. I added 1/2 cup each flour and water every 12 hours, removing an equal amount of starter. There were bubbles on the surface, so I knew it was working, but neither had the 'good sourdough smell' various websites and books told me it would have. Scully smelled like vinegar, and Mulder smelled a bit like vomit. I worried about it, but kept going with them because I'd named them already. After about a week, I moved them to jars in the fridge and started feeding them weekly.
Just before putting them in the refrigerator, I tried baking a loaf of bread with Scully. It was a simple white bread recipe I'd found on one of the websites I'd read for instructions on starting sourdough. It did not rise at all, despite my leaving it out over 12 hours. I went ahead and baked it anyway, and ended up with a rock-hard mass of delicious-tasting sourdough bread.
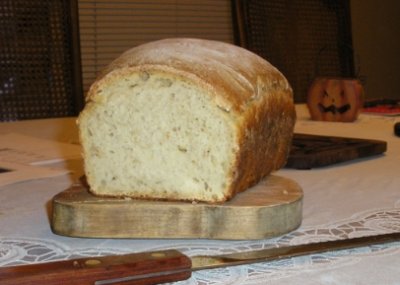
My next three attempts were similar, until a friend with some experience baking with sourdough offered some tips. She recommended the book listed on the side, World Sourdoughs From Antiquity, and told me how to catch the starter as it was peaking to bake. When the yeast in the starter is at its strongest, the top few inches will be foamy with air bubbles. I thought it looked a lot like tapioca pudding. I tried making the most basic recipe from that book (recipe below) with my starter at this point, and it rose perfectly and baked into the loaf above. Because of the addition of butter and milk to the dough, it ended up being very soft, like a normal bread, while I had been hoping for the dense, chewy crumb of an artisanal loaf. But that would come.

Knowing more about the process of baking sourdough, I went back to try a French Country Sourdough (Recipe from The Bread Book.) I had failed to make twice before. It was one of the few recipes I found that called for a wheat starter. The ingredients are also nothing more than flour, water, and salt, so it was closer to what I was looking for, though I'd definitely cut back on the salt next time. (3 1/2 tablespoons is waaay too much for one loaf of bread.)
I have also improvised a few loaves of bread, including a sauerkraut & red onion bread everyone but me enjoyed, and I've substituted my starter for pâte fermenté in other recipes with success.
World Sourdoughs from Antiquity by Ed Wood (not that Ed Wood)
World Sourdough Bread
-makes 2 loaves
4 cups culture from the first proof
2 tablespoons butter
1 cup milk
2 teaspoons salt
2 tablespoons sugar
6 cups white bread flour
save and refrigerate 1 cup of culture from the first proof before proceeding.
1. Measure the culture into a large mixing bowl. Melt the butter over moderate heat (or melt in microwave). Add the milk to the butter and warm briefly (to 75 or 85 degrees), add the salt and sugar, and stir until dissolved. Add this mixture to the culture and mix well.
2. Add the flour, one cup at a time, stirring until the dough is too stiff to mix by hand. Turn onto a floured board and knead in the remaining flour until the dough is smooth and satiny. Divide the dough in half and form 2 balls.
3. Pat each ball into a 1-inch thick oval and form loaves by rolling the ovals up from the long side, pinching the seam together as you roll the dough to form the loaf.
4. Place in loaf pans and proof, covered, at 85* for 1 1/2 to 3 hours (mine took about 4 hours -gk) When the dough rises 1 to 2 inches above the edges of the pan, it is ready to bake.
5. Preheat the oven to 375*. Bake for 10 minutes, then reduce heat to 350* and bake an additional 45 minutes.
6. Remove loaves from the oven and brush the tops lightly with melted butter. Turn the loaves out of the pans and cool on a wire rack.
(To let the loaves rise, I turned the oven on to warm for about 1 minute, so it would be about 90*, then turned it off. I reheated the oven like this a couple times over the 4 hours they sat. Then I would suggest slitting the tops so they stay pretty... And I left the loaves in the oven while it preheated to 375* so they would get one last rise, and let them stay in 8 or 9 minutes after the oven had heated all the way.
I would also suggest making half a recipe, unless you have loads of starter and want two loaves. But half would have been just as nice, I think.)